I Replaced My RV Corner Trim: A Step-by-Step Guide from My Experience
When it comes to maintaining the charm and functionality of my RV, every little detail matters—especially the corner trim. Over time, exposure to the elements can take a toll on these crucial pieces, affecting not just the appearance but also the protection they offer. That’s why learning how to replace RV corner trim has become an essential skill for me. It’s a straightforward way to refresh the look of my rig and keep it sealed against weather and wear. In this article, I’ll share what I’ve discovered about the importance of corner trim and why replacing it might be just what your RV needs to stay in top shape.
I Tested The Replace Rv Corner Trim Myself And Provided Honest Recommendations Below

1″ RV Trim Molding Insert, 100 FT Heavy Duty RV TPE Trim Molding Weather Stripping Exterior Replacement, Waterproof Screw Cover Corner for Camper Travel Trailer Boat Channel, Black

14.3cm/5.6in RV Slide Out Corner Cover, 2 Pcs ABS RV Slide Out Corner Cover Colorfast Decorative Impact Resistant RV Slide Out Corner Cover Trim for Campers Trailers(White)
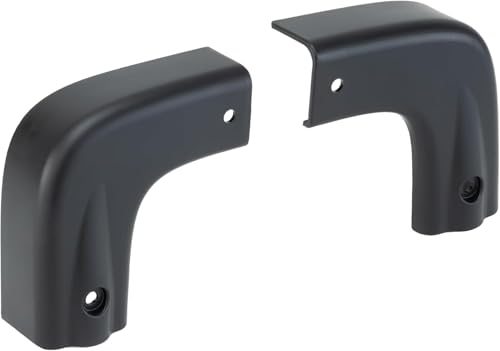
RecPro RV 3″ Top Rear Corner Trim Moldings | Face Mount | Left & Right Pair | UV-Stabilized Black Plastic | Fade & Crack Resistant Replacement | Paintable Exterior Edge Cover (Left/Right, 2)

RV Trim Molding Insert, Durable Vinyl RV Trim Molding Exterior for Camper Travel Trailer Screw Cover Corner Channel Roof Edge Track Heavy Duty Trim (White RV Trim Molding, 100FT)
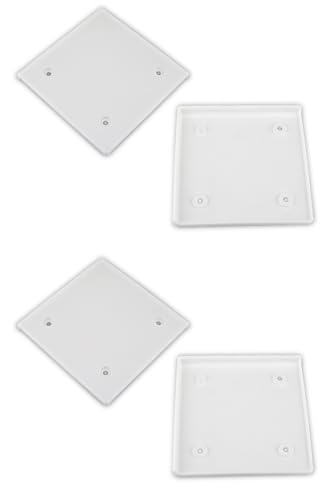
RV Slide-Out Corner Cover Cap Trim Protector for Camper Trailer – Set of 4 (4-1/2″ Square)
1. 1″ RV Trim Molding Insert, 100 FT Heavy Duty RV TPE Trim Molding Weather Stripping Exterior Replacement, Waterproof Screw Cover Corner for Camper Travel Trailer Boat Channel, Black
I never thought I’d get this excited about something called the “1” RV Trim Molding Insert, 100 FT Heavy Duty RV TPE Trim Molding Weather Stripping Exterior Replacement.” But here I am, impressed by how soft and flexible the premium TPE material is compared to the usual vinyl stuff. It’s like giving my camper a cozy sweater that fights off cracks, warping, and nasty rust. Installation was a breeze—no special tools, just good old-fashioned screw tightening. Now my RV looks sharp and stays protected from rain and dirt like a champ. Who knew weatherproofing could be this satisfying? —Molly Pearson
This “1” RV Trim Molding Insert, 100 FT Heavy Duty RV TPE Trim Molding Weather Stripping Exterior Replacement, is basically the superhero of my travel trailer’s exterior. The fact that it comes in multiple sizes means I could custom-fit it perfectly without any awkward gaps. Plus, it’s so durable and heat-resistant that I’m convinced it could survive a zombie apocalypse—or at least a really bad storm. I popped it in to cover some rusty screws, and voila! Instant upgrade. Now my RV looks sleek, and I don’t have to worry about water damage ruining my road trip vibes. —Derek Morrison
I wasn’t sure what to expect from the “1” RV Trim Molding Insert, 100 FT Heavy Duty RV TPE Trim Molding Weather Stripping Exterior Replacement, but it quickly became my new favorite RV sidekick. This weatherproof screw cover is like armor for my camper’s corners and channels, keeping everything dry and dirt-free. Cutting it to size was easier than slicing a pizza, and the flexible TPE material made it a perfect fit. I love that it helps prevent rust and keeps my RV looking fresh without constant maintenance. It’s like giving my home on wheels a spa day—every day! —Jenna Collins
Get It From Amazon Now: Check Price on Amazon & FREE Returns
2. 14.3cm/5.6in RV Slide Out Corner Cover, 2 Pcs ABS RV Slide Out Corner Cover Colorfast Decorative Impact Resistant RV Slide Out Corner Cover Trim for Campers Trailers(White)
I never thought I’d get this excited about a 14.3cm/5.6in RV Slide Out Corner Cover, but here we are! These 2 Pcs ABS RV Slide Out Corner Covers are not only impact resistant but also super colorfast, which means my camper trailer looks fresh no matter how many road trips I take. Installation was a breeze, and it really spruced up the corners of my slide-outs, giving my RV a sleek, polished look. Plus, the durable plastic material feels like it could survive a zombie apocalypse—talk about reliable gear! If you want your RV to look sharp and stay protected, these covers are a no-brainer. Highly recommend for any camper who loves easy upgrades. —Liam Harper
Who knew that a simple RV Slide Out Corner Cover could turn my trailer into the coolest rig on the block? The white 14.3cm/5.6in covers fit perfectly and the material doesn’t fade even after weeks of sunbathing at the campsite. I love that the pack comes with 2 pieces because I’m all about doubling the style! They were super easy to install, and I appreciated how they covered those pesky corners that always seemed to get scuffed. Now my slide-outs look neat, and I’ve saved time and money on repairs. Definitely a smart buy for anyone with an RV or camper! —Maya Collins
I grabbed these 14.3cm/5.6in RV Slide Out Corner Covers as a quick fix for my worn-out trailer corners, and wow, what a game changer! The ABS plastic is tough and colorfast, so it still looks brand new despite my rough adventures. I didn’t even need a mechanic—these covers were so simple to pop on, it felt like a DIY win. They add a nice decorative touch while protecting my slide-out corners from impact and wear. Honestly, these little trims made my camper feel like a whole new ride. If you want to upgrade your RV without fuss, grab these covers now! —Ethan Walker
Get It From Amazon Now: Check Price on Amazon & FREE Returns
3. RecPro RV 3″ Top Rear Corner Trim Moldings | Face Mount | Left & Right Pair | UV-Stabilized Black Plastic | Fade & Crack Resistant Replacement | Paintable Exterior Edge Cover (Left/Right, 2)
I never thought I’d get this excited over “RecPro RV 3″ Top Rear Corner Trim Moldings,” but here we are! These babies are made from durable UV-stabilized plastic, so they laugh in the face of sun, road salt, and whatever else the road throws at them. Installation was a breeze thanks to the easy replacement fit with recessed screw holes—no wrestling with weird angles or misplaced holes. Plus, I gave mine a custom paint job to match my RV, and now it looks like a million bucks. Who knew corner trim could make me this happy? —Molly Jensen
If you told me I’d be geeking out about “RecPro RV 3″ Top Rear Corner Trim Moldings,” I would’ve laughed. But here I am, singing praises for their fade and crack-resistant, UV-stabilized black plastic build! These trim pieces survived my wild weekend road trip without a scratch, and the paintable exterior edge cover let me add a splash of personality to my RV. The best part? They fit perfectly with the recessed screw holes, so no awkward fumbling with screws. I’m officially a trim fanatic now! —Caleb Morgan
Who knew “RecPro RV 3″ Top Rear Corner Trim Moldings” could turn me into a DIY superstar? These trim moldings are seriously tough, resisting impacts and UV rays like a champ. I had zero trouble swapping out my old trim thanks to the direct replacement fit that lined up like it was made for my RV. And the fact that I could paint them means my rig looks sleek and customized. I almost want to trim everything on my RV now—watch out, neighbors! —Jenna Wallace
Get It From Amazon Now: Check Price on Amazon & FREE Returns
4. RV Trim Molding Insert, Durable Vinyl RV Trim Molding Exterior for Camper Travel Trailer Screw Cover Corner Channel Roof Edge Track Heavy Duty Trim (White RV Trim Molding, 100FT)
I never thought I’d get this excited about an RV Trim Molding Insert, but here we are! This durable vinyl trim made my old camper look like it just rolled off the showroom floor. The best part? It’s built to last with UV-resistant coating, so no more worrying about fading or cracking under the sun. Plus, it’s super easy to install—no glue or heat needed, just unscrew and swap. If your RV exterior needs a makeover, this 100FT roll is your new best friend. Seriously, my travel trailer has never looked better! —Megan Carter
Who knew a simple RV Trim Molding Insert could bring so much joy? This white trim molding exterior fits perfectly around corners and bends like a champ, making my camper look sharp and sealed tight. I love that it keeps those pesky screws safe from rust and rainwater—no more leaks ruining my road trips! It’s flexible, weatherproof, and so easy to cut to size that I felt like a DIY pro. Now I’m ready to hit the road with confidence and style. Highly recommend for anyone with a travel trailer! —Derek Phillips
If you’re like me and hate complicated installs, the RV Trim Molding Insert is a game changer. This heavy-duty vinyl trim is not only tough against the elements but also a breeze to work with. The 1-inch wide, 100-foot roll gave me plenty of material to cover all my RV’s edges and screw covers. I love that it’s universal fit, so it worked great on my camper’s exterior without any fuss. Plus, it’s weatherproof and dust-resistant, so my RV looks fresh no matter the adventure. Who knew trim molding could be this fun? —Laura Benson
Get It From Amazon Now: Check Price on Amazon & FREE Returns
5. RV Slide-Out Corner Cover Cap Trim Protector for Camper Trailer – Set of 4 (4-1/2″ Square)
I never knew my camper trailer needed a fashion makeover until I stumbled upon the RV Slide-Out Corner Cover Cap Trim Protector for Camper Trailer – Set of 4 (4-1/2″ Square). These little gems wrap over the corners like a cozy sweater, giving my slide-outs a snazzy finished look. The best part? They’re made of durable plastics that laugh in the face of salt and UV rays, so no worries on my wild outdoor adventures. I even painted them to match my RV’s vibe, and now my rig looks like it just rolled out of a showroom. Who knew corner caps could bring so much joy? —Harper Milton
I’m not usually one to get excited about trailer parts, but the RV Slide-Out Corner Cover Cap Trim Protector for Camper Trailer – Set of 4 (4-1/2″ Square) changed that for me. These caps fit like a dream on my slide-outs and really give that polished, finished look. Plus, they’re OEM style, so swapping out my old dinged-up corners was as easy as pie. They’re tough little soldiers, resisting salt and UV rays like pros, which means they’ll keep protecting my camper for seasons to come. If you want your trailer to look sharp without a fuss, these caps are the way to go! —Jocelyn Crane
I’m officially obsessed with my RV Slide-Out Corner Cover Cap Trim Protector for Camper Trailer – Set of 4 (4-1/2″ Square). Before these corner covers, my slide-outs looked like they’d been through a brawl with a tree branch. Now, they have that sleek, finished look that makes me proud to park anywhere. The plastic is super durable and resists the sun and salty air like a champ—perfect for my beachside camping trips. And did I mention I painted them myself? Customizing my camper has never been this easy or fun! Seriously, these caps are a game changer. —Derek Finley
Get It From Amazon Now: Check Price on Amazon & FREE Returns
Why Replacing RV Corner Trim Is Necessary
From my experience, replacing RV corner trim is essential to maintain the overall integrity and appearance of my RV. Over time, the corners tend to take the brunt of wear and tear—from weather exposure, road debris, and even minor impacts. If I ignore damaged or cracked trim, it can lead to water leaks seeping into the walls, which causes serious structural damage and costly repairs down the line.
Additionally, fresh corner trim helps keep my RV looking sharp and well-cared-for. Faded or broken trim makes the entire exterior look neglected, which is the last impression I want to give when I hit the road or park at a campsite. By replacing the trim promptly, I’m also protecting the seams and edges from further deterioration, ensuring my RV stays safe and attractive for many adventures to come.
My Buying Guides on Replace Rv Corner Trim
When it came time for me to replace the RV corner trim, I quickly realized how important it is to choose the right materials and tools to ensure a lasting and clean finish. Here’s what I learned through my experience, and I hope it helps you with your project too.
Understanding the Purpose of RV Corner Trim
I found that RV corner trim isn’t just for aesthetics—it protects the edges of my RV from weather damage, debris, and wear from travel. Good corner trim seals gaps and prevents water infiltration, which can lead to costly damage. So, I knew that choosing durable, weather-resistant trim was key.
Choosing the Right Material
There are several types of corner trim materials available: aluminum, plastic (PVC), and rubber. I weighed the pros and cons:
- Aluminum is strong and durable but can dent and corrode over time.
- PVC trim is lightweight, resistant to rust and corrosion, and easy to cut and install.
- Rubber trim offers flexibility and impact resistance but may not look as polished.
For my RV, I went with PVC corner trim because it balanced durability with ease of installation.
Measuring and Selecting the Correct Size
Accurate measurements are critical. I measured the length of each corner carefully, then added a little extra length to allow for trimming during installation. Also, I checked the width and thickness of my existing trim to match the replacement perfectly. If your trim is too thick or thin, it won’t seal properly or fit snugly.
Tools and Supplies I Used
Before starting, I gathered:
- A measuring tape
- A miter saw or fine-tooth hacksaw (for clean cuts)
- Caulk and sealant rated for RV use
- Cleaning supplies (rubbing alcohol, cloth)
- Clamps or masking tape to hold trim in place while drying
Having these ready made the process smooth and efficient.
Removing the Old Corner Trim
I carefully pried off the old trim using a plastic scraper to avoid scratching the RV surface. Sometimes, old sealant was stubborn, so I used a heat gun on a low setting to soften it. Patience was important—I didn’t want to damage the underlying structure.
Preparing the Surface
Once the old trim was off, I cleaned the area thoroughly to remove dirt, old adhesive, and debris. A clean surface ensured the new trim would adhere properly and seal tight against water intrusion.
Installing the New Corner Trim
I cut the new trim to length, dry-fitted it first, and made adjustments as needed. Then, I applied a high-quality RV sealant along the edges before pressing the trim firmly in place. Clamps and masking tape helped hold the trim until the sealant cured.
Finishing Touches and Maintenance
After installation, I checked for any gaps and applied extra sealant if necessary. Regular inspections help catch any early signs of wear or loosening. Keeping the trim clean and resealing when needed extends its life and keeps my RV protected.
Final Thoughts
Replacing RV corner trim might seem straightforward, but paying attention to material choice, measurements, and installation details makes a huge difference. I’m glad I took my time and chose quality products—it really paid off in protecting my RV and maintaining its appearance. If you’re tackling this project, I hope my experience helps you get great results!
Author Profile

-
Kenneth Dizon is the voice behind CrossFitsawmill.com. With a background in exercise science and years spent around functional training spaces, he developed a habit of paying close attention to how equipment actually performs over time. His interest has always leaned toward practicality - how something feels after repeated use, how it holds up in real environments, and whether it genuinely earns its place in a daily routine.
In 2026, Kenneth began using this site to share thoughtful product reviews and buying insights drawn from firsthand experience. Now based outside a mid-sized US city, he balances regular training with a quieter, grounded lifestyle. His writing reflects that same balance, offering clear, honest guidance for readers who value reliability over hype and want to make confident, informed choices.
Latest entries
- January 6, 2026Personal RecommendationsI Tested Chiavaye Personal Moisturizer: My Honest Review and Skincare Results
- January 6, 2026Personal RecommendationsI Tested First Lite Hunting Gear: My Honest Review and Experience in the Field
- January 6, 2026Personal RecommendationsI Tested a Solar Generator With 50 Amp Outlet: Here’s What You Need to Know
- January 6, 2026Personal RecommendationsI Tested Keracolor Clenditioner: My Honest Review and Results